Get started in three steps
The basic flow is: open your photos, check the auto-correction results, and export.
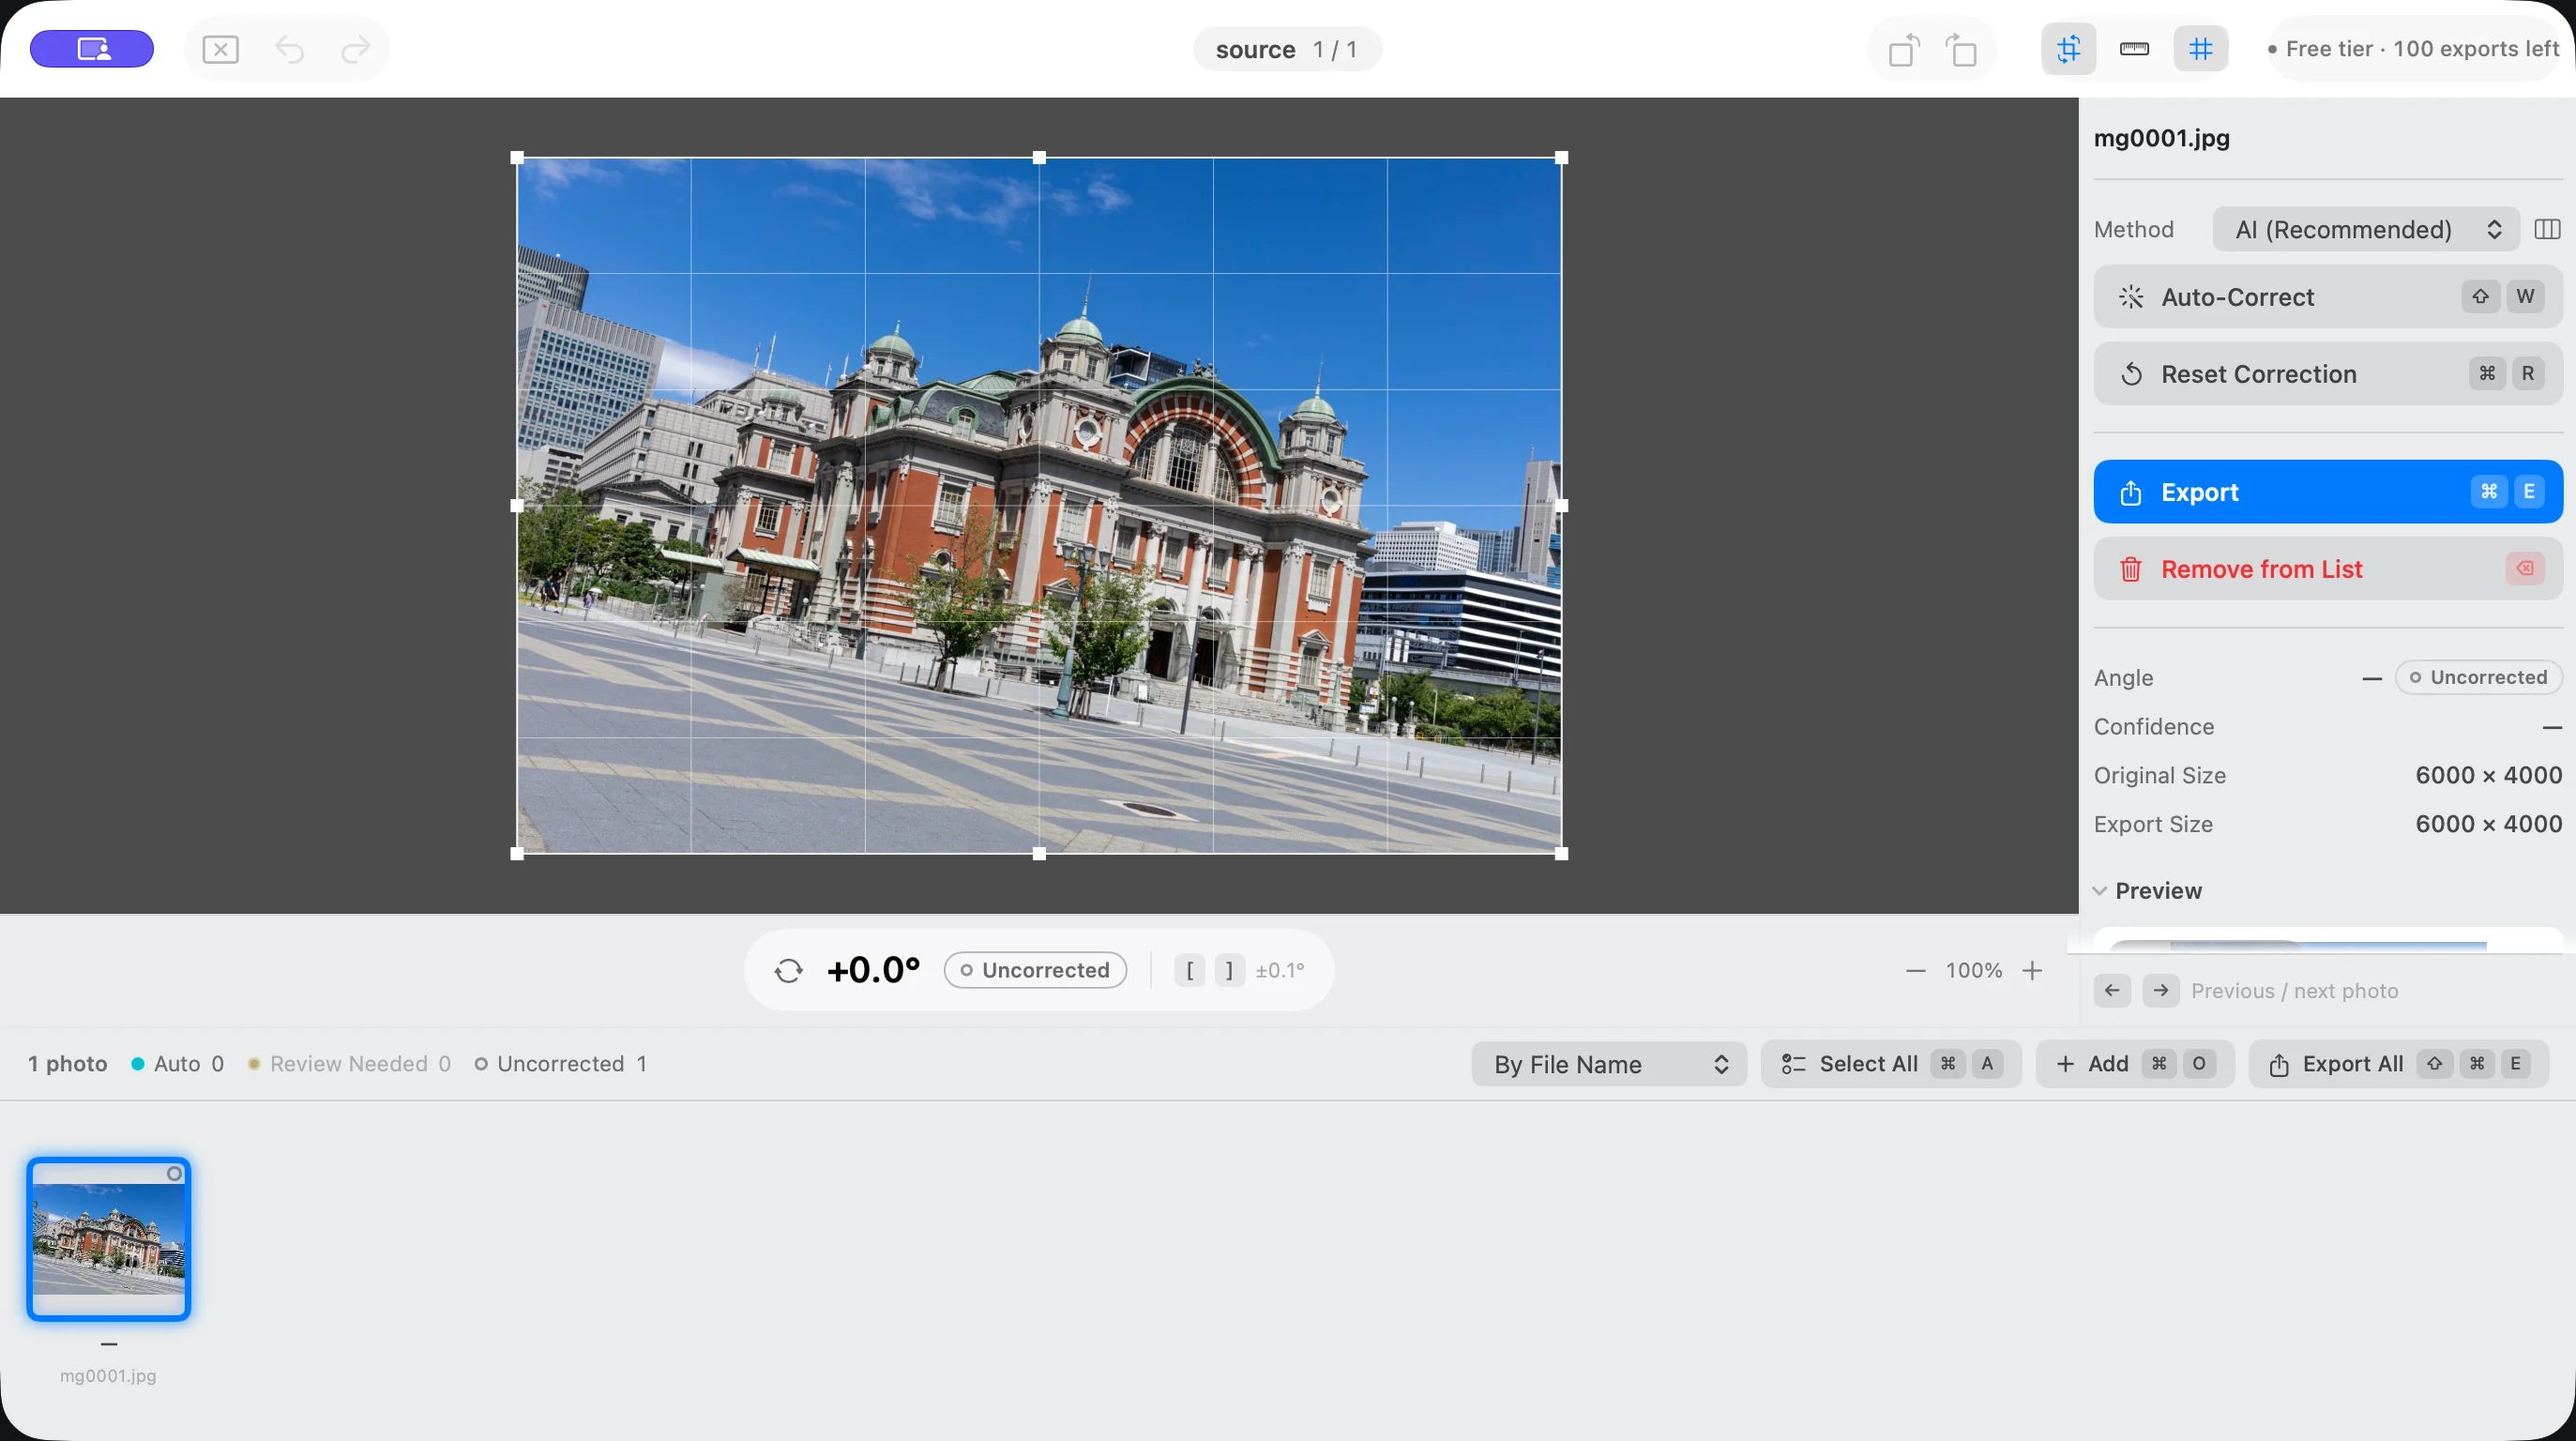
- Choose a folder or photos with Add Photos… (⌘O), or drag them onto the window.
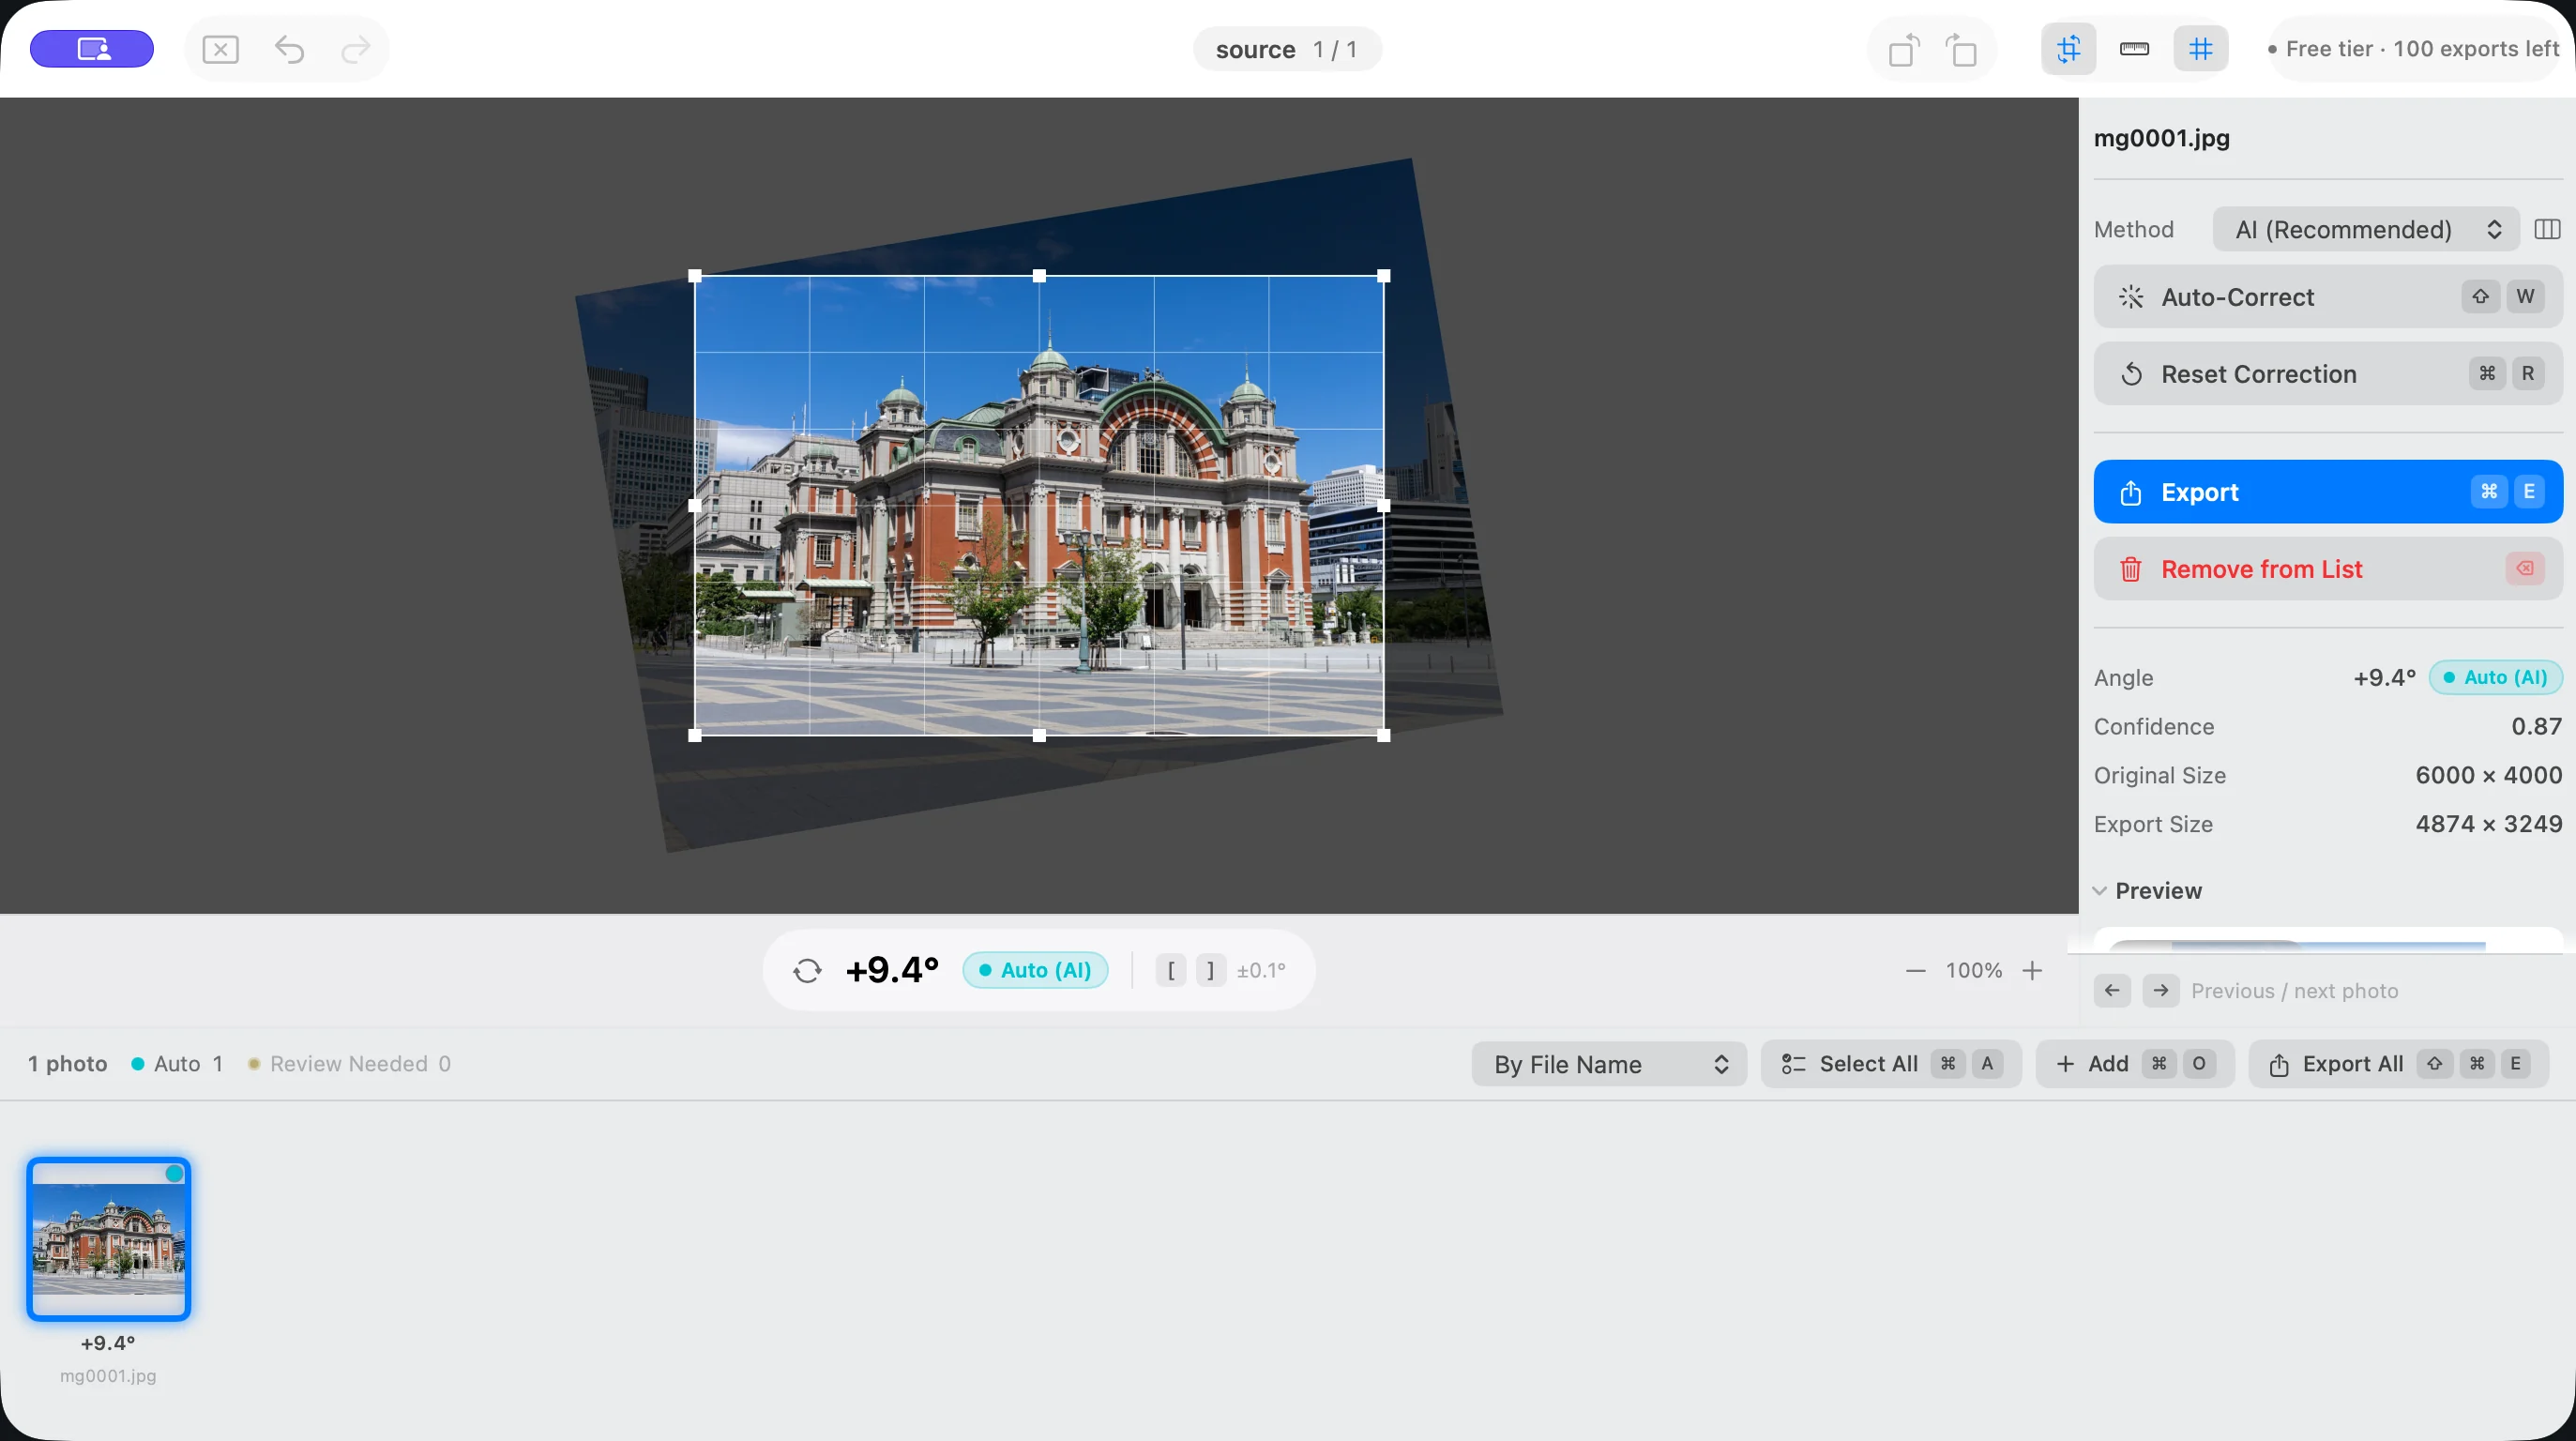
- Opening photos does not rotate them. Run Apply Auto-Correction (⇧W) or Auto-Correct All (⌥⇧W), then check the results in the list.
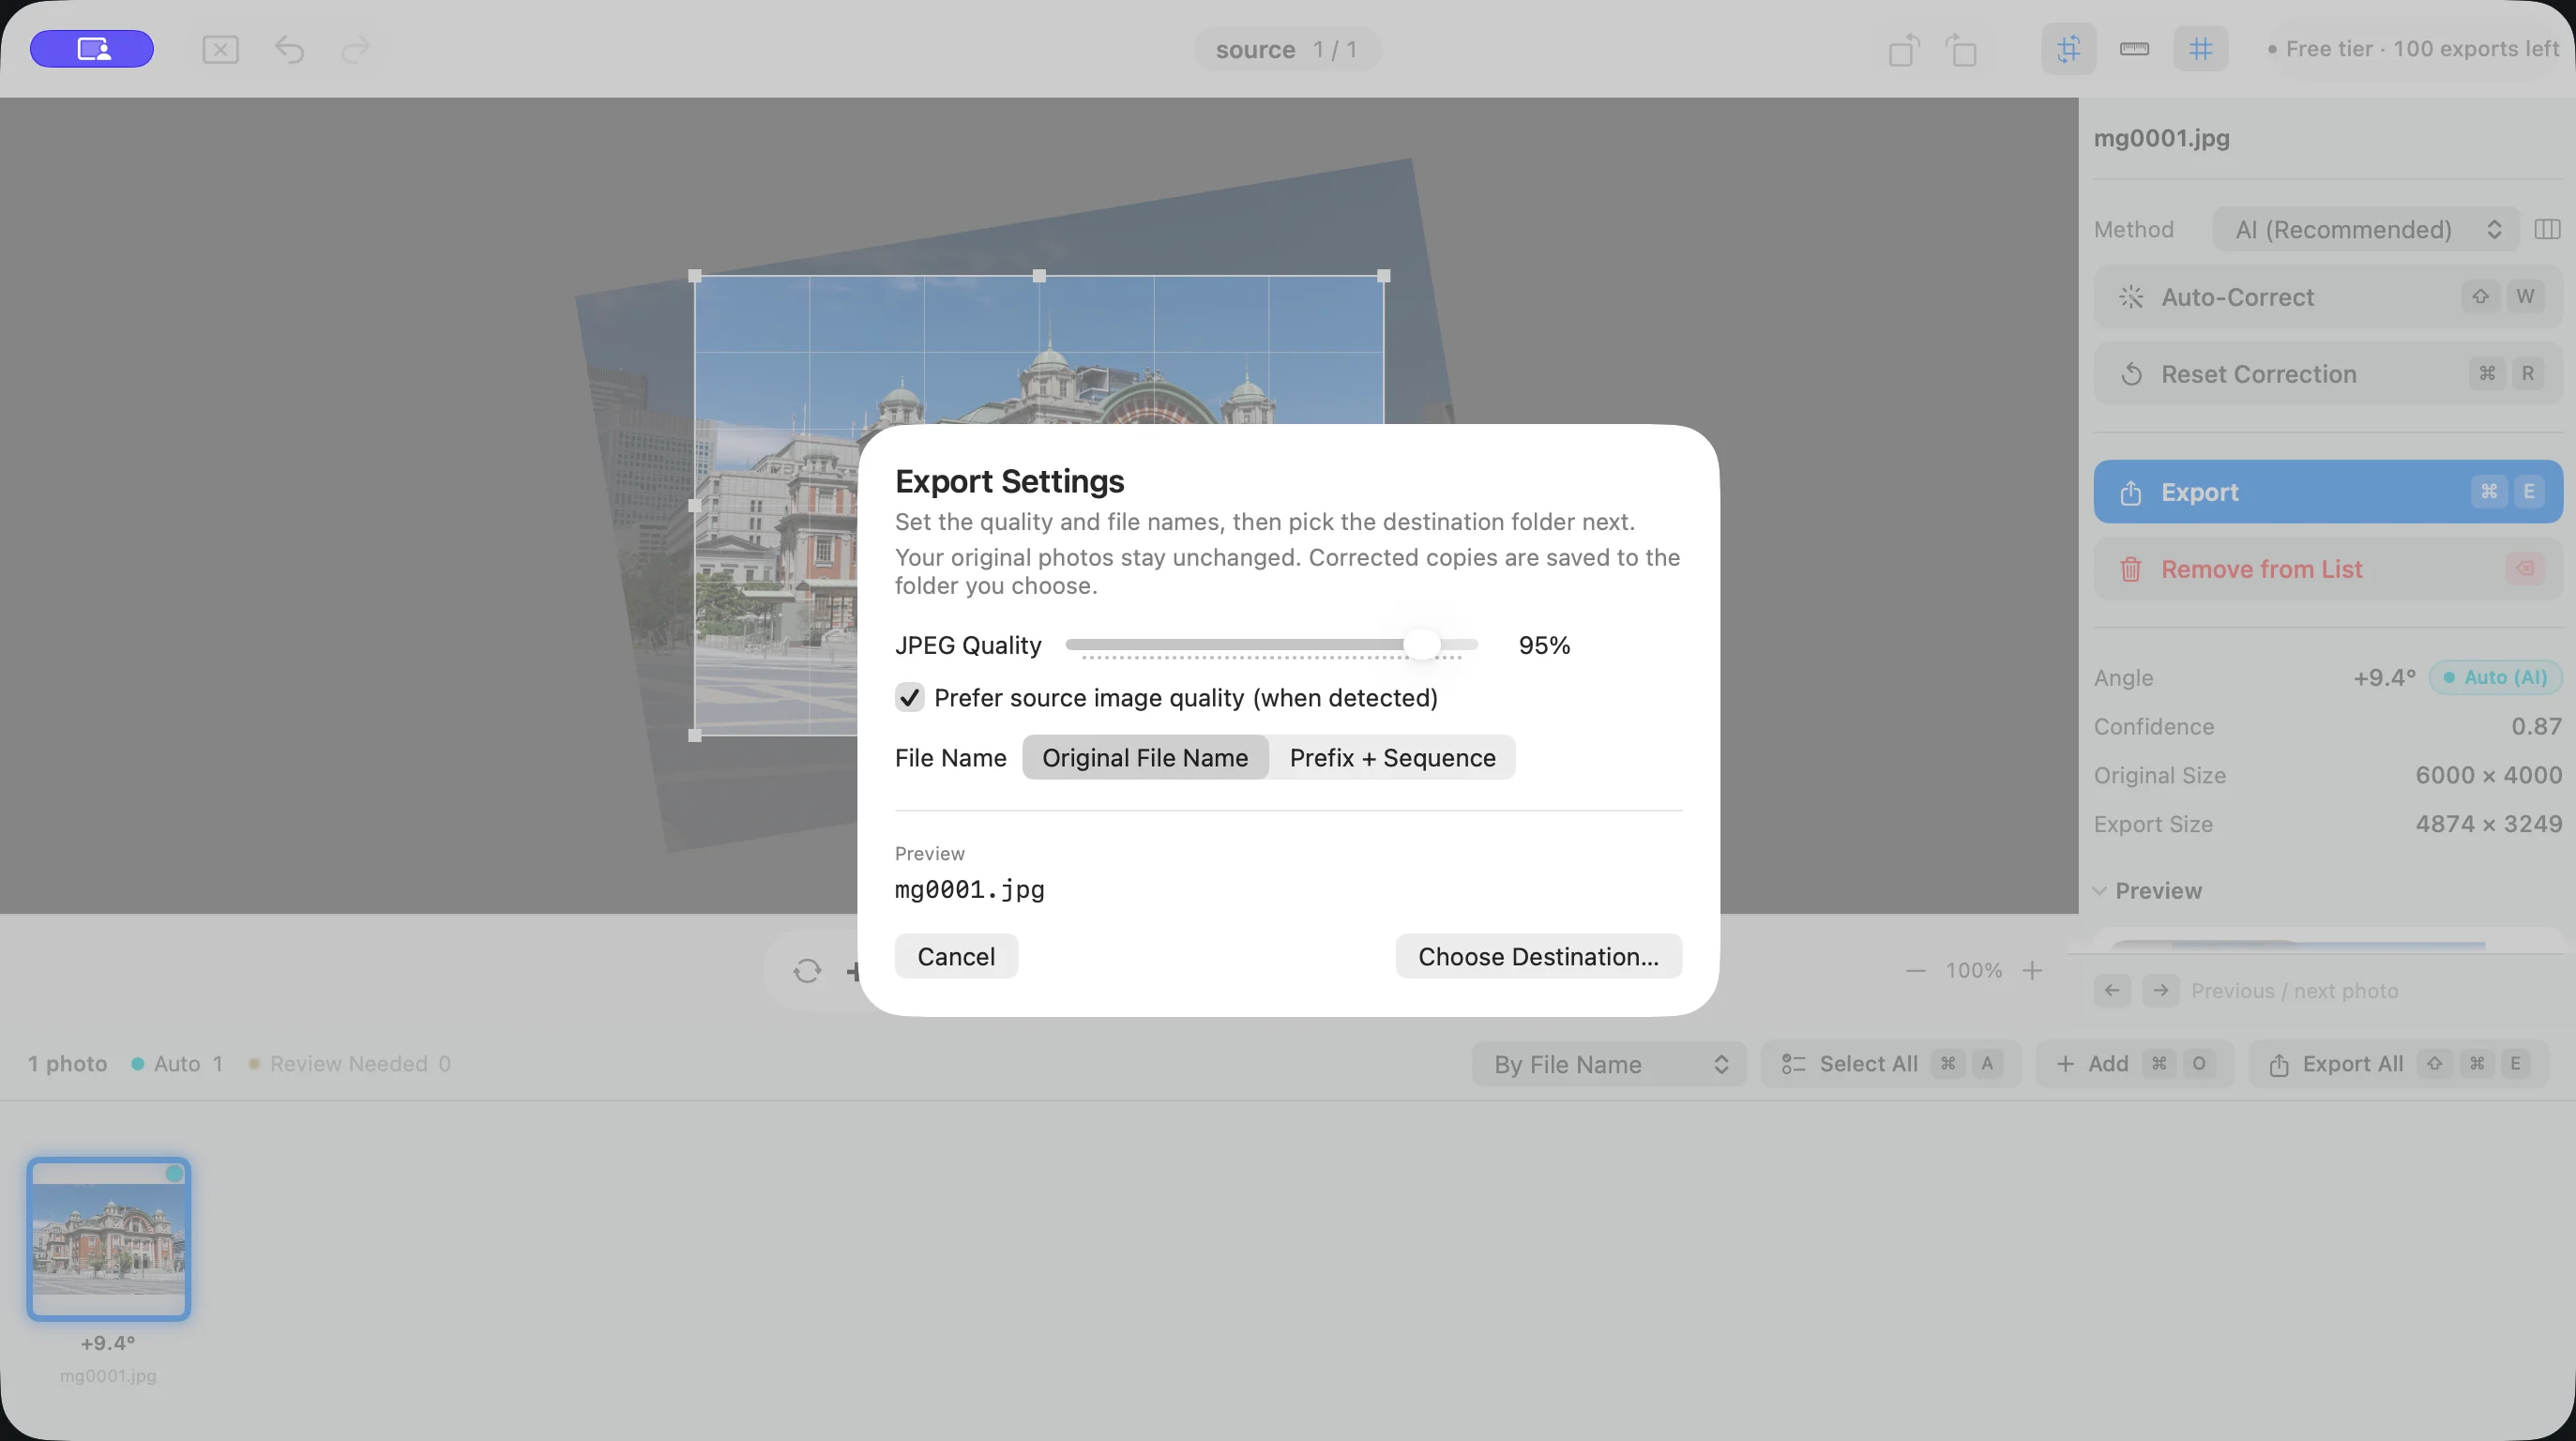
- Choose Export All… (⇧⌘E), pick the quality and a destination, and export corrected copies. Your original photos are never changed.
Open photos
Choose photos or a folder with Add Photos… (⌘O). Choosing a folder loads all supported images inside it. You can also drag items from Finder onto the window or the app icon. Suihei opens JPEG, HEIC, and PNG files.
- Reopen a recent folder or photo from Open Recent.
- Each window holds its own set of photos. Close File Set closes the list in that window.
- Save Session (⌘S) saves your edits, including angles and crops. They are restored the next time you open Suihei.
- To take photos out of the list, select them and use Remove Selected from List (⌫). The original files are not deleted.
Auto-correction
Apply Auto-Correction (⇧W) corrects the selected photos, and Auto-Correct All (⌥⇧W) corrects every photo in the list. Each photo is analyzed on its own; Suihei never applies one angle to the whole set.
Choose how the tilt is estimated with Method in the side panel or in Settings. The Adjust menu in the menu bar collects the correction commands.
- AI (default): the AI built into Suihei estimates the tilt from how the photo looks. Processing stays on your Mac, and photos are never sent anywhere. Use this in most cases.
- Vision: analyzes horizons and the vertical and horizontal lines of buildings using several methods. Try it on photos where the AI result does not fit.
Switching the method does not correct anything by itself. The new method is used the next time you run auto-correction.
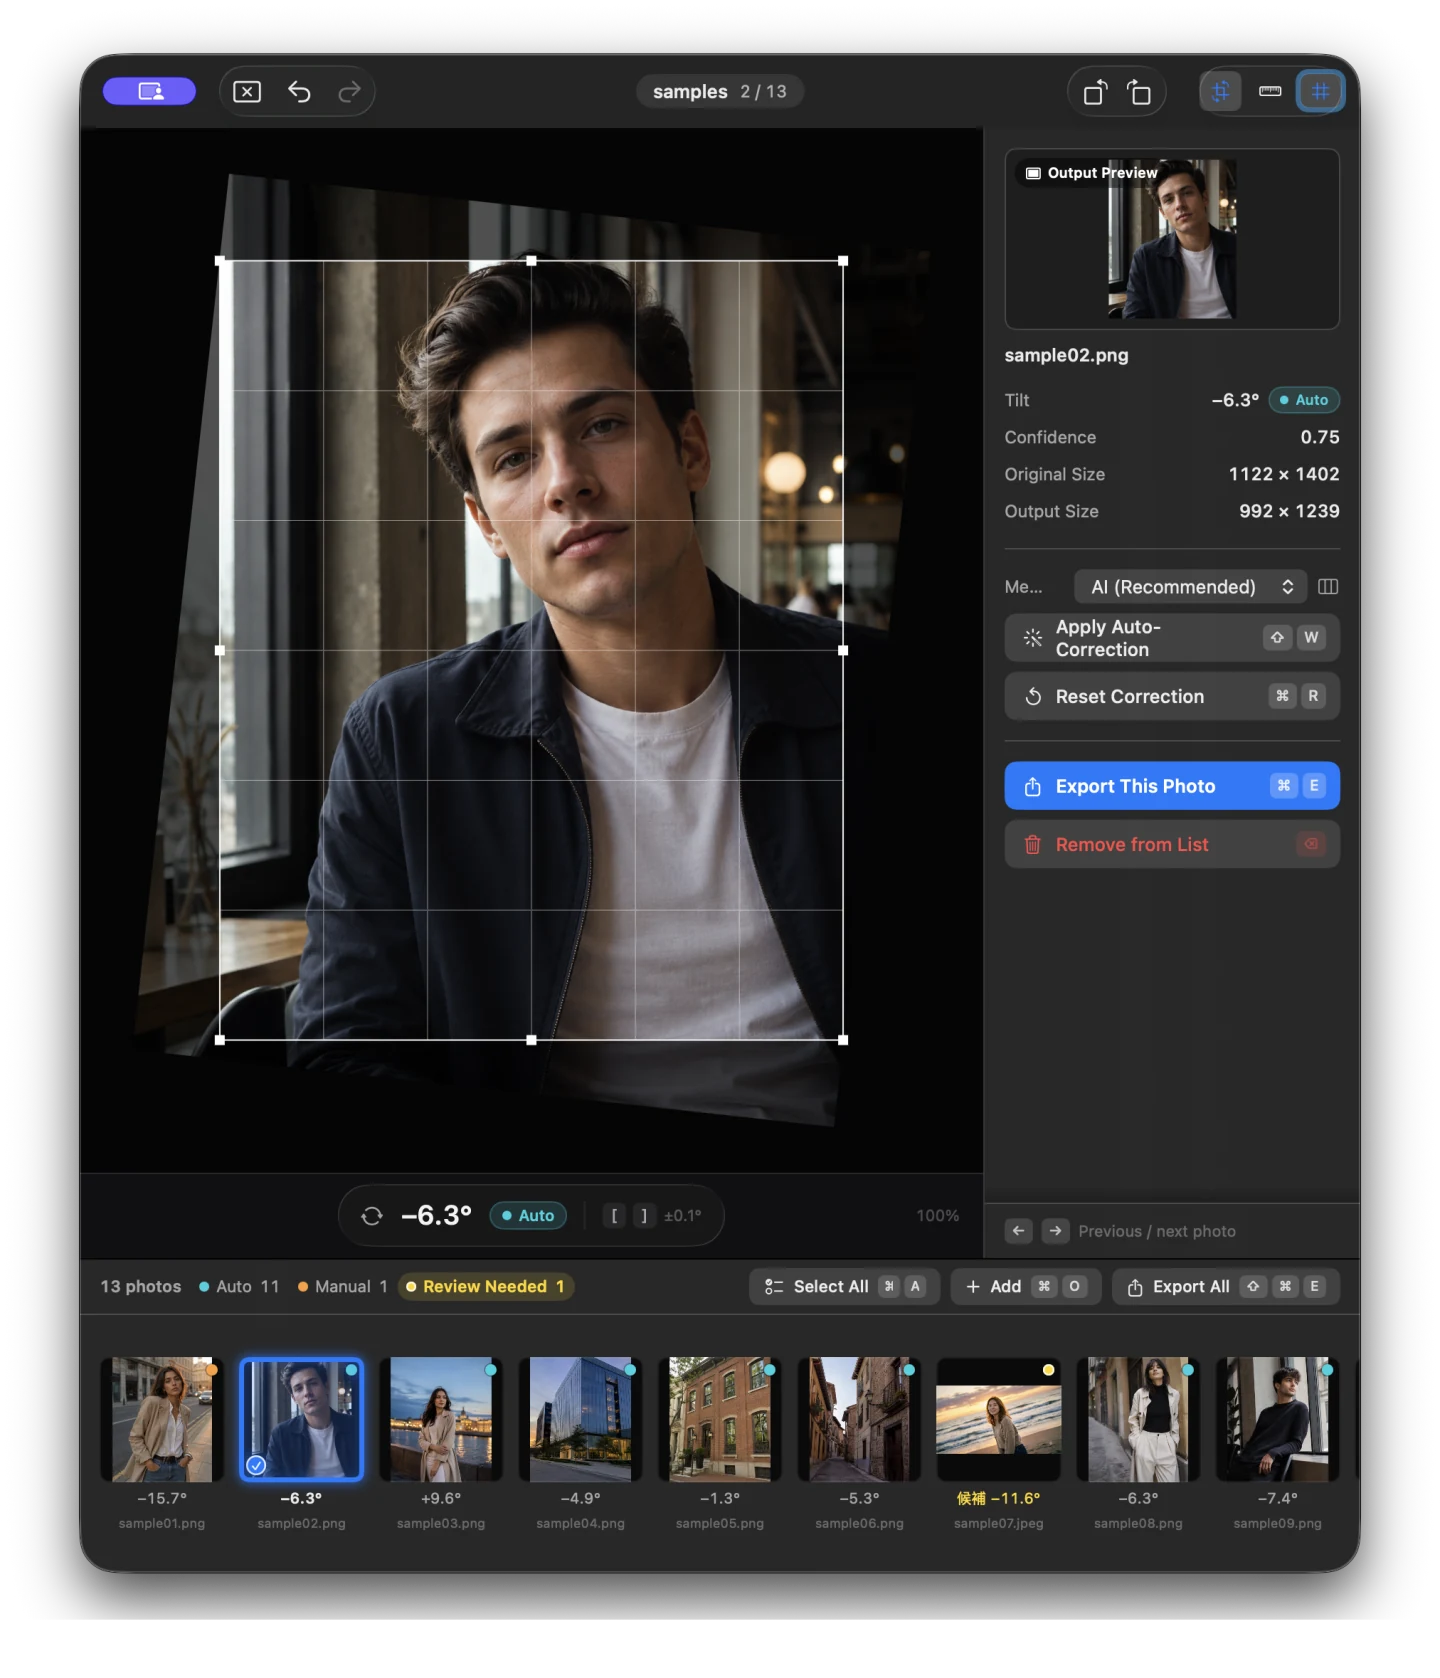
Results appear on the thumbnails in the list. Two states need your attention:
- “Unreviewed”: Suihei found a candidate angle but did not apply it automatically. Look at the preview and, if it looks right, confirm it with Confirm Suggestion (⌃⇧W). Exports stay unrotated until you confirm.
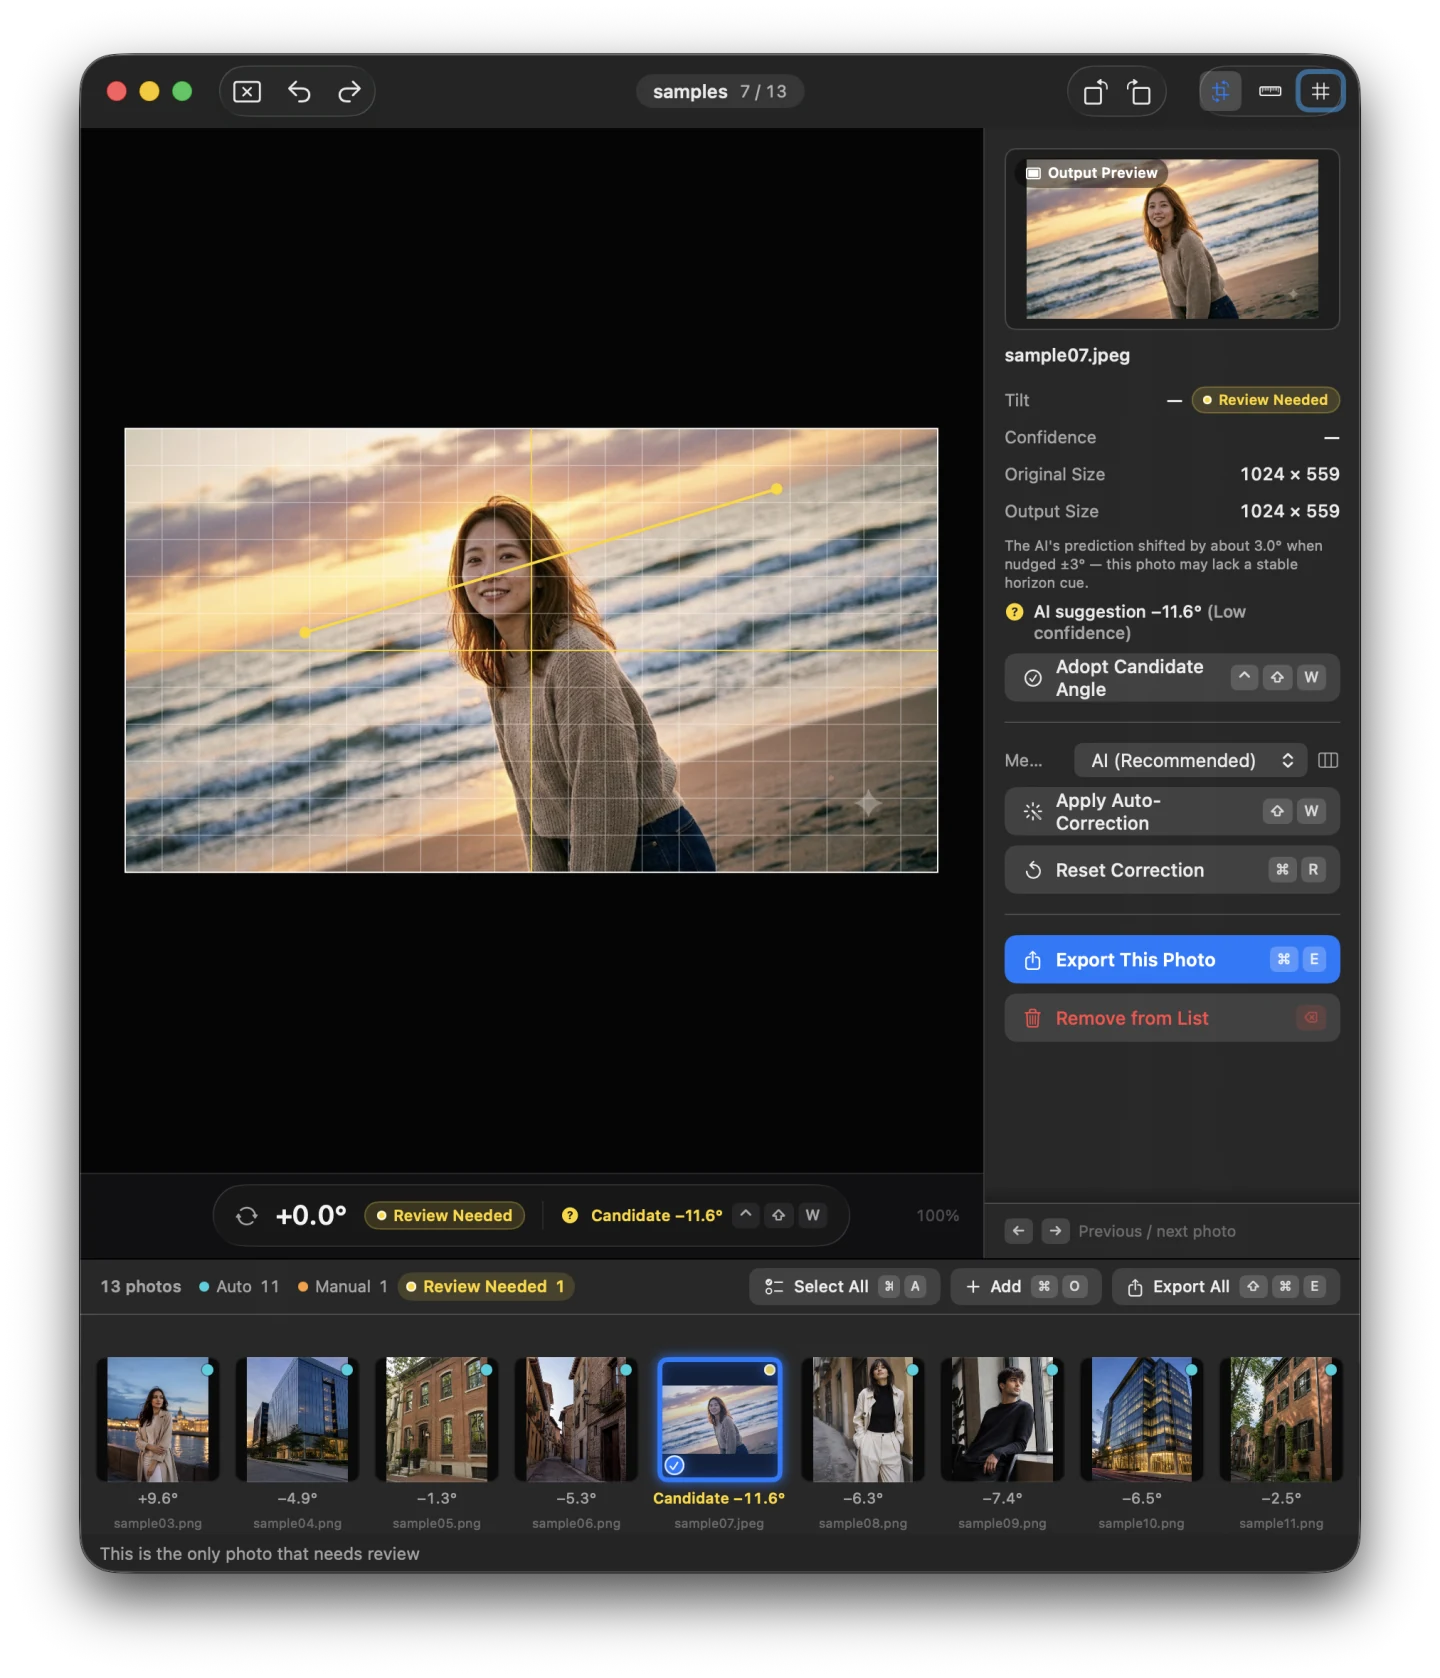
- “Review Needed”: Suihei could not determine the tilt. Straighten these photos manually.
Next Needing Review (N) and Previous Needing Review (⇧N) step through the photos that need a look. Stop long-running work with Stop Processing (⌘.).
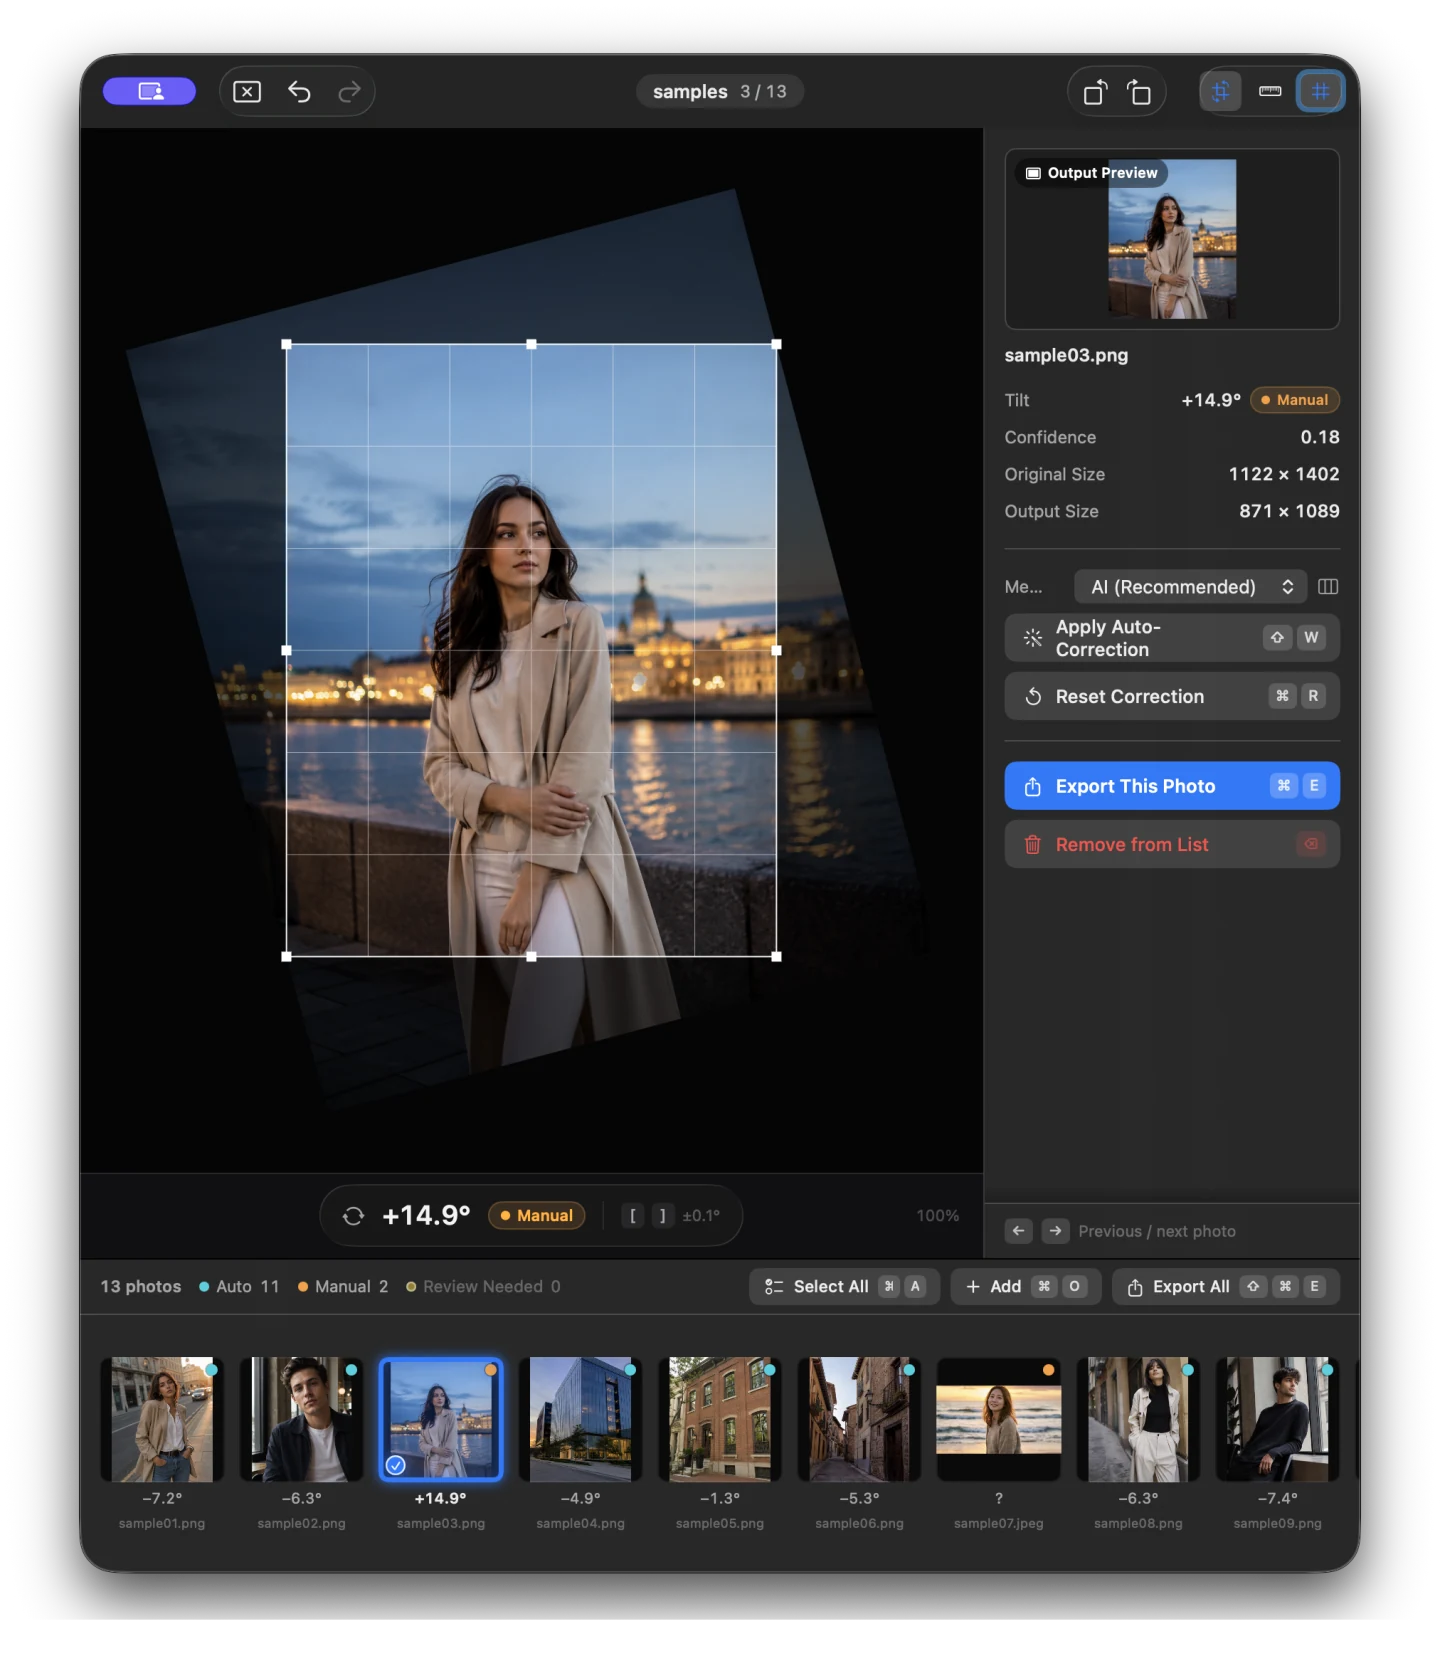
The screens in this section use generated demo photos. They do not show customer photos or measured correction accuracy.
Straighten by hand
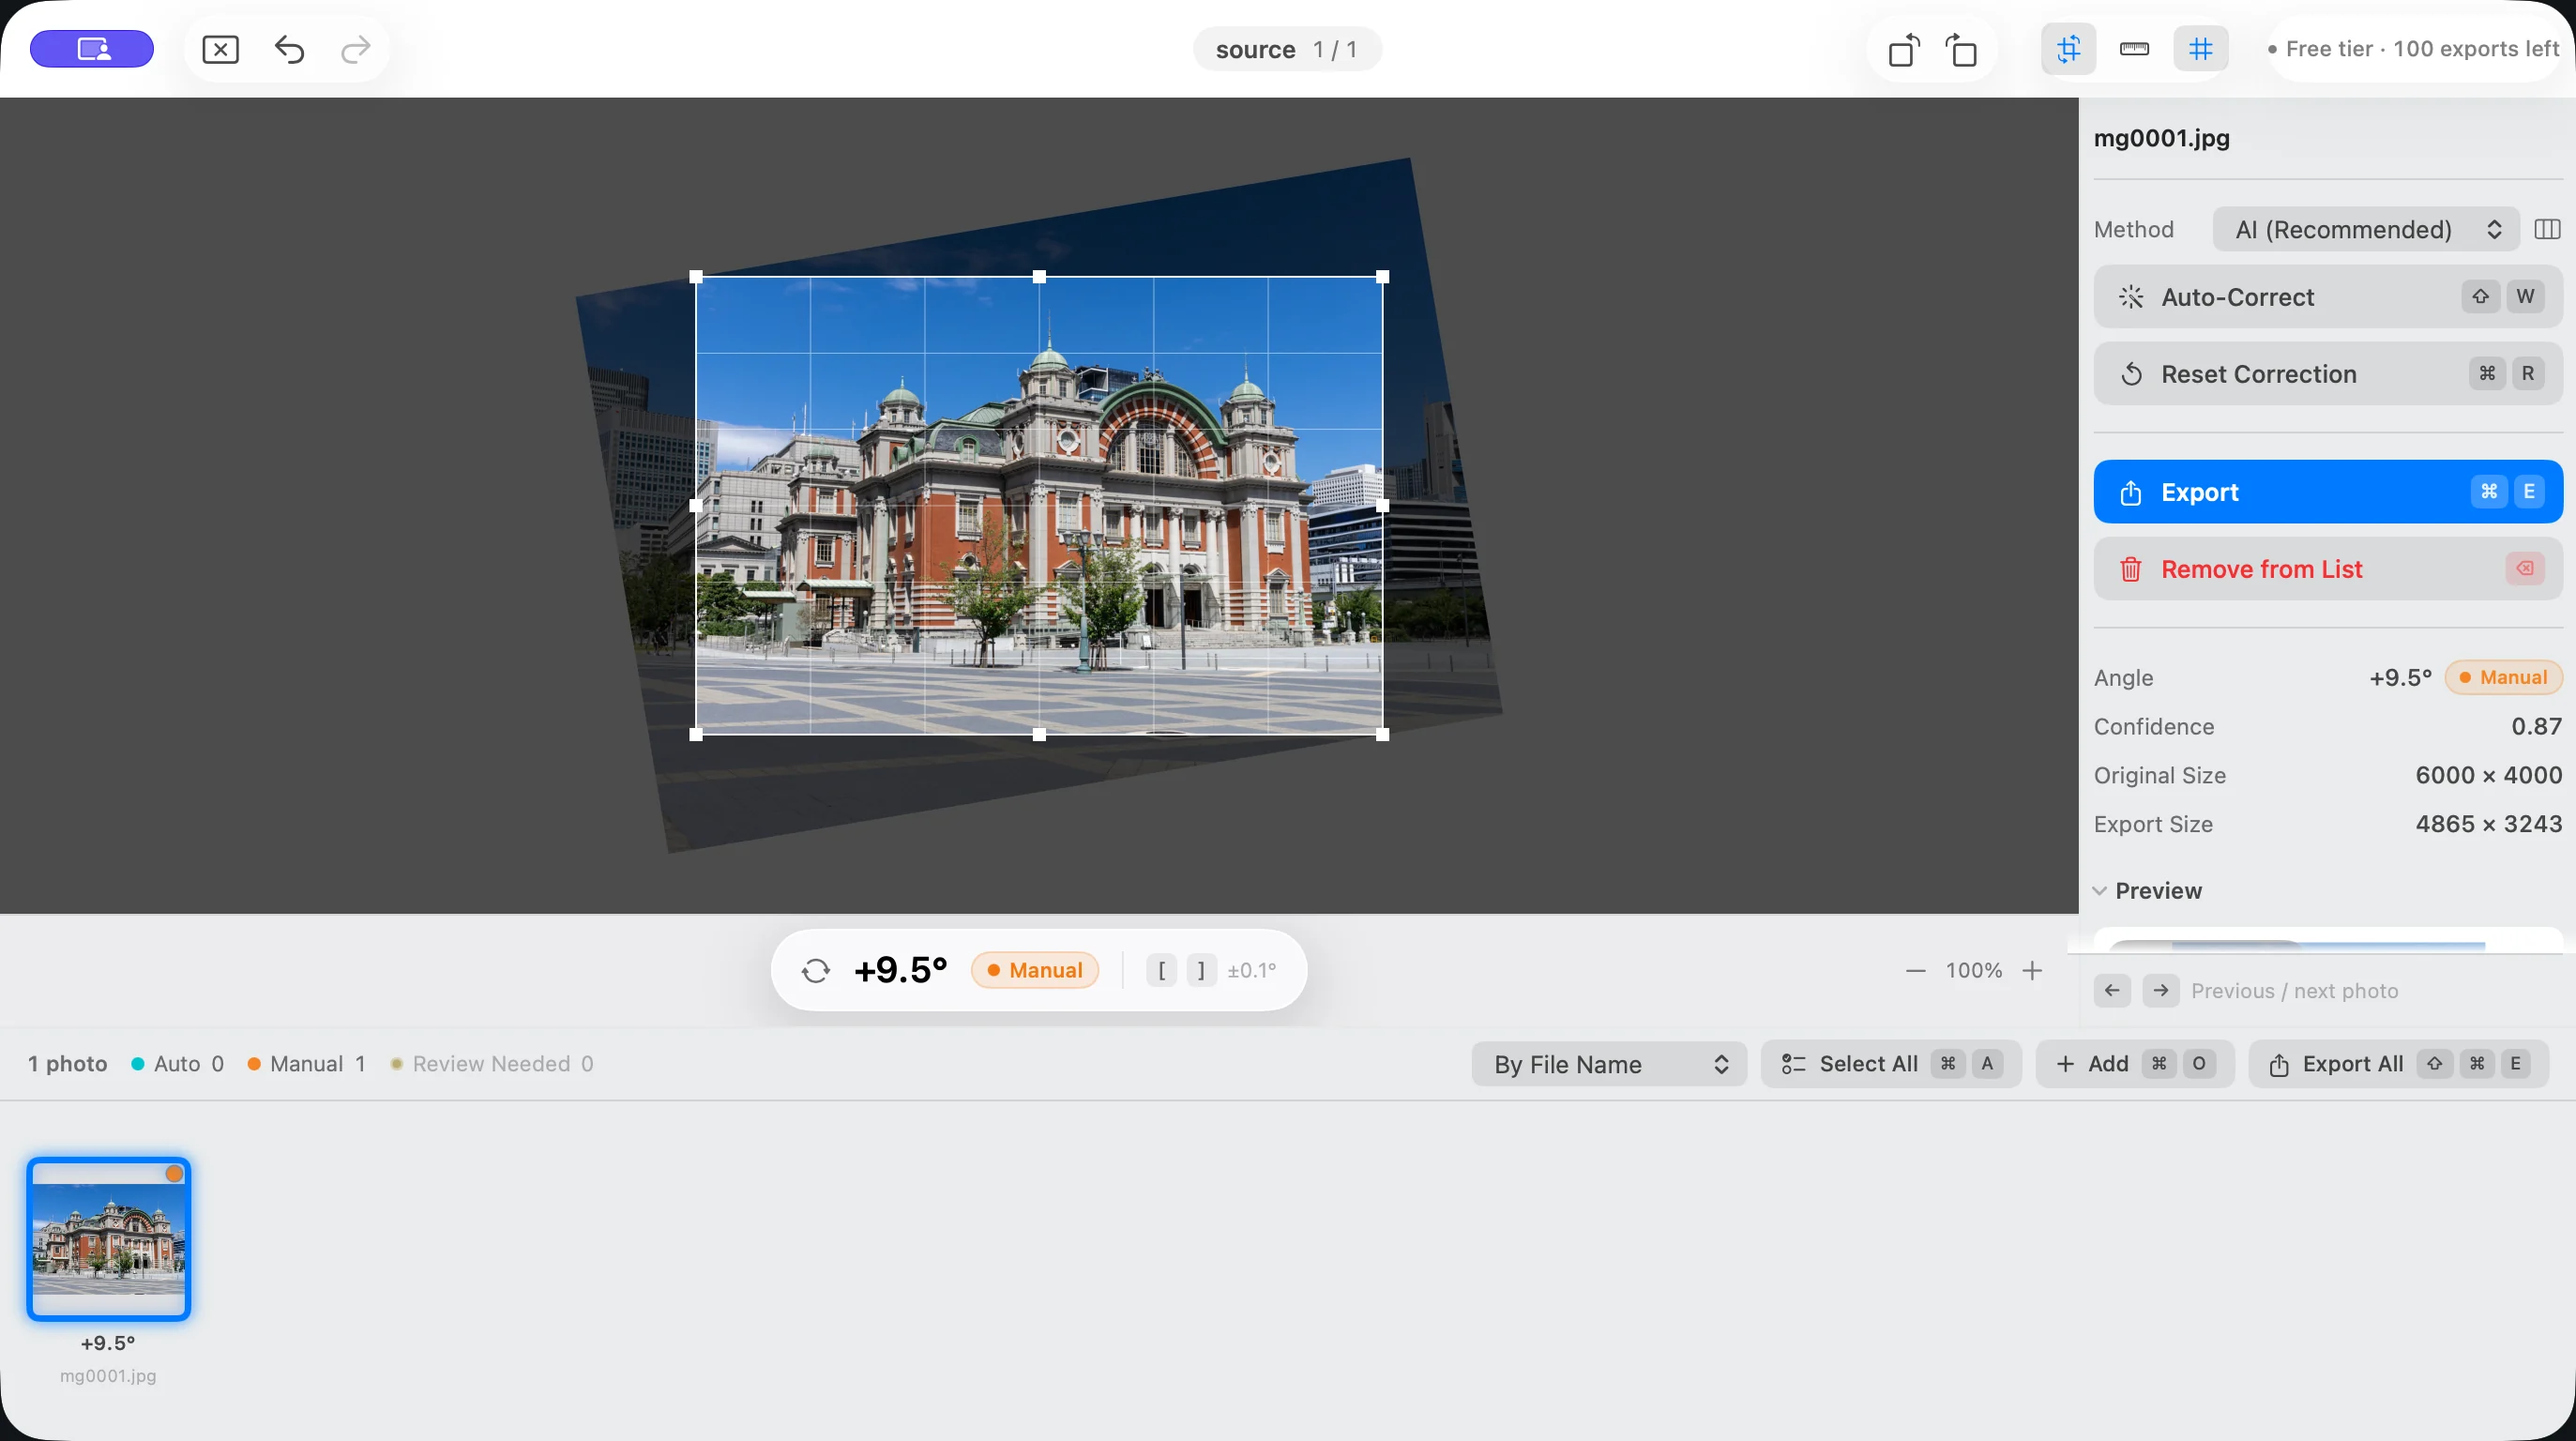
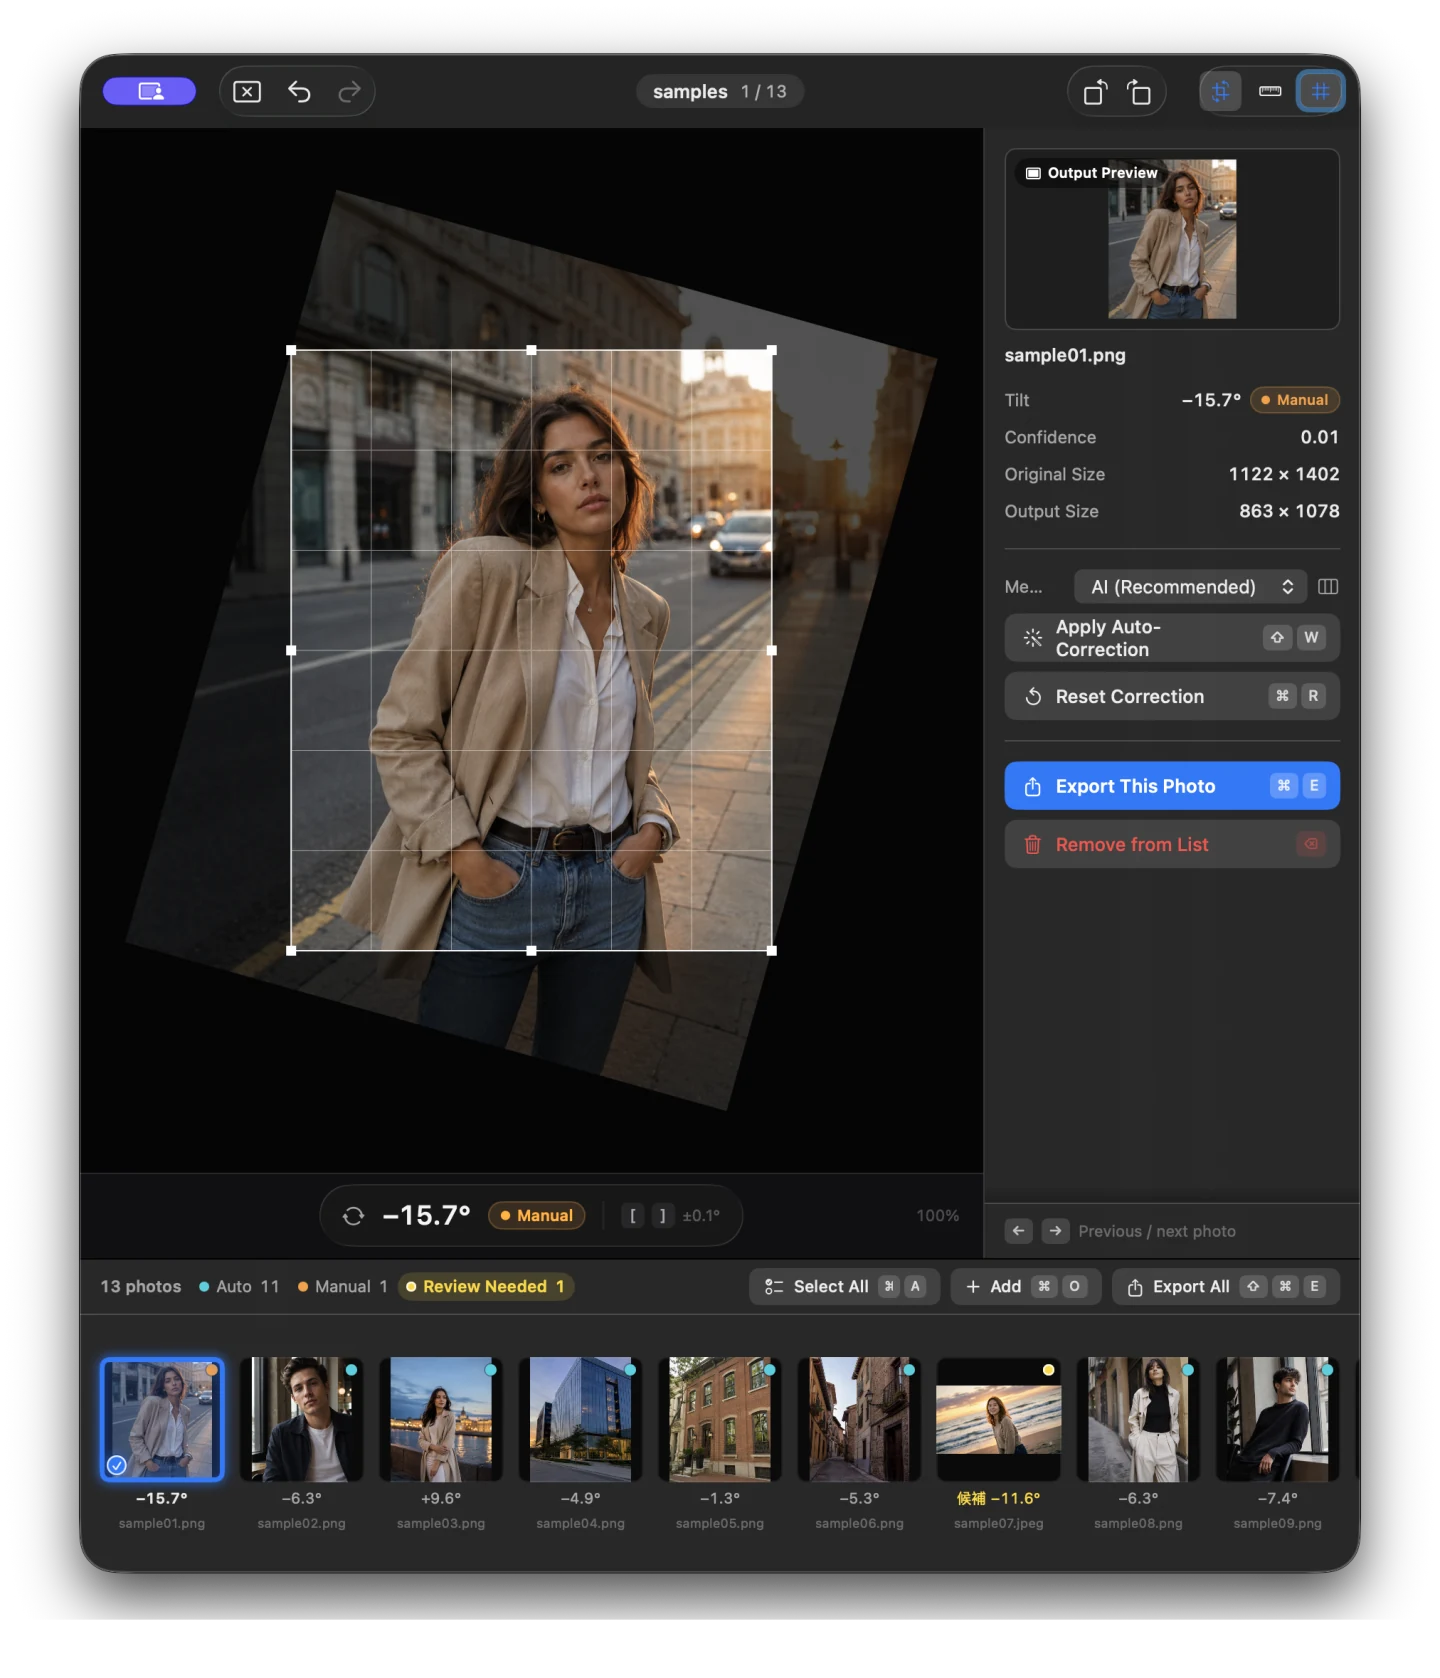
The selected photo can be edited directly in the center of the window.
- Drag outside the photo frame to rotate. Hold ⌘ while dragging to rotate from anywhere in the photo.
- Rotate Left 0.1° ([) and Rotate Right 0.1° (]) rotate in 0.1° steps; Rotate Left 1.0° (⇧[) and Rotate Right 1.0° (⇧]) rotate in 1.0° steps.
- Rotate Left 90° (⌘[) and Rotate Right 90° (⌘]) turn the photo without losing quality.
- Turn on Leveling Tool (trace a line to level) (⌘L) and trace a line you want to use as a reference, such as a horizon or a wall. Suihei rotates the photo so that the line becomes level or plumb. You can also hold ⌥ and drag to use it right away.
- Toggle Preview / Rotate (R) switches between checking the result and rotating.
- Reset Correction (⌘R) returns the photo to its uncorrected state. Undo and redo changes with Undo (⌘Z) and Redo (⇧⌘Z).
The screens in this section use generated demo photos. They do not show customer photos or measured correction accuracy.
Crop
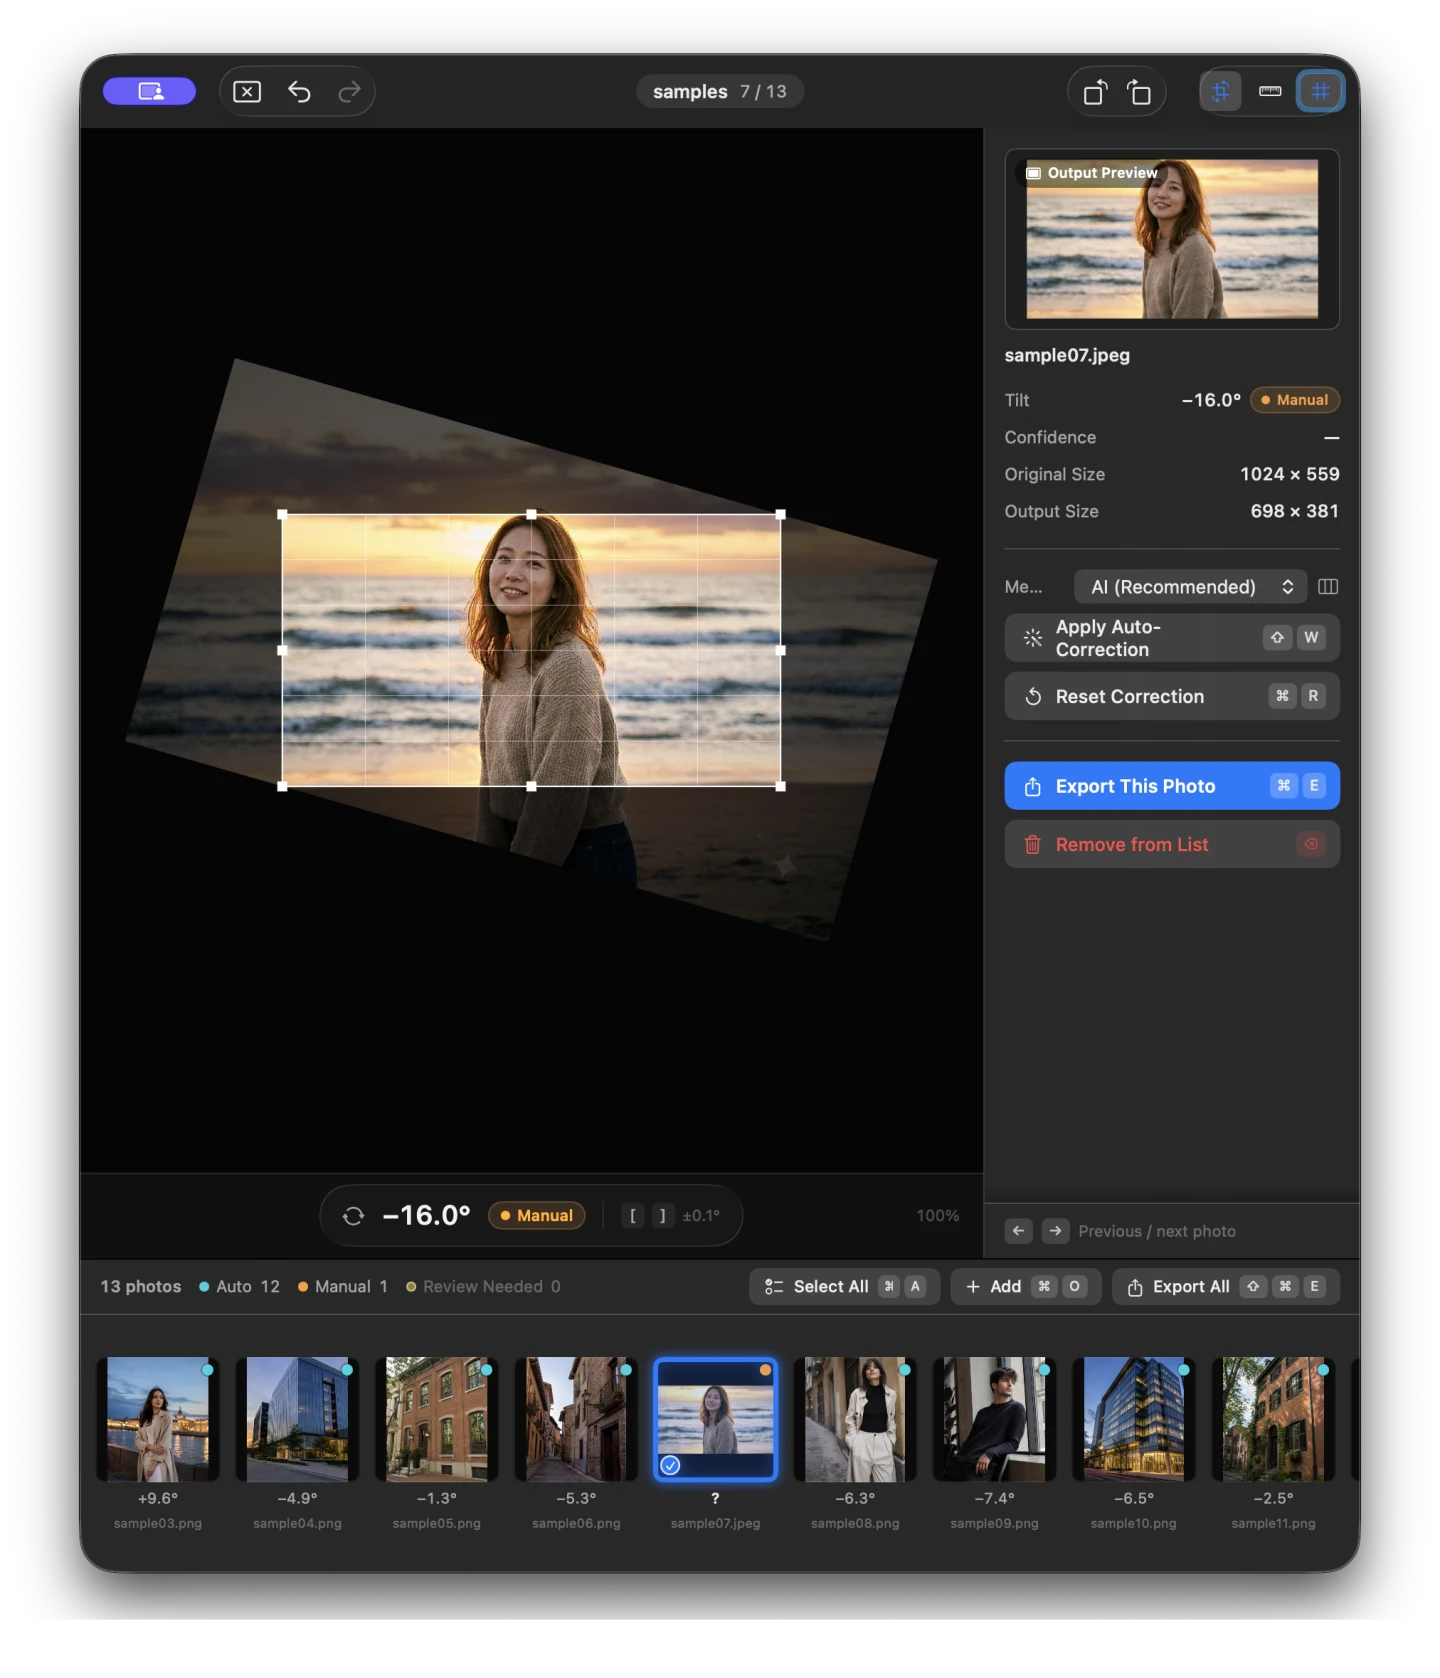
When a photo is rotated, Suihei automatically crops to the largest rectangle that fits inside it, so no empty corners remain.
- Drag a corner or an edge of the crop to resize it while keeping the aspect ratio. It never grows large enough to show empty corners.
- Drag inside the crop to move it.
- Nudge the crop with Move Crop Left (⌥←) and the other directions, or move it further with Move Crop Left (Fast) (⌥⇧←) and its counterparts.
- Resize it with Enlarge Crop (⌘↑) and Shrink Crop (⌘↓).
All crop commands are in the Crop menu in the menu bar.
The screens in this section use generated demo photos. They do not show customer photos or measured correction accuracy.
View and navigation
- Zoom with Zoom In (⌘=) and Zoom Out (⌘-), the mouse wheel, or a trackpad pinch.
- While zoomed in, move the image with a two-finger swipe, by dragging while holding Space, or by dragging with the middle mouse button.
- Fit to Window (⌘0) resets the zoom and position.
- Move between photos with Previous Photo (←) and Next Photo (→). Select several photos with Extend Selection Backward (⇧←) and Extend Selection Forward (⇧→).
- Select All (⌘A) selects everything in the list, and Deselect All (⇧⌘A) clears the selection.
Export
Export Selection… (⌘E) exports the selected photos, and Export All… (⇧⌘E) exports the whole list. Set the quality and file names in Export Settings first, then choose the destination folder.
If the photos to export include Unreviewed photos, Suihei asks you first. Choose “Confirm All and Export” to confirm the candidates and export, or “Cancel and Review” to go back and check the unreviewed photos.
- Corrected photos are saved as JPEG files that carry over the supported EXIF information. Choose the quality with JPEG Quality.
- Depending on the format, photos without a correction may be copied as they are, without re-encoding.
- File names can get a prefix and sequential numbers.
- Your original photos are never changed, and Suihei never exports over an original file.
- If some photos could not be exported, Show Failures on the completion screen lists the file names and the reasons.
For the free export allowance and “Unlock Export,” see Pricing.
Keyboard shortcuts
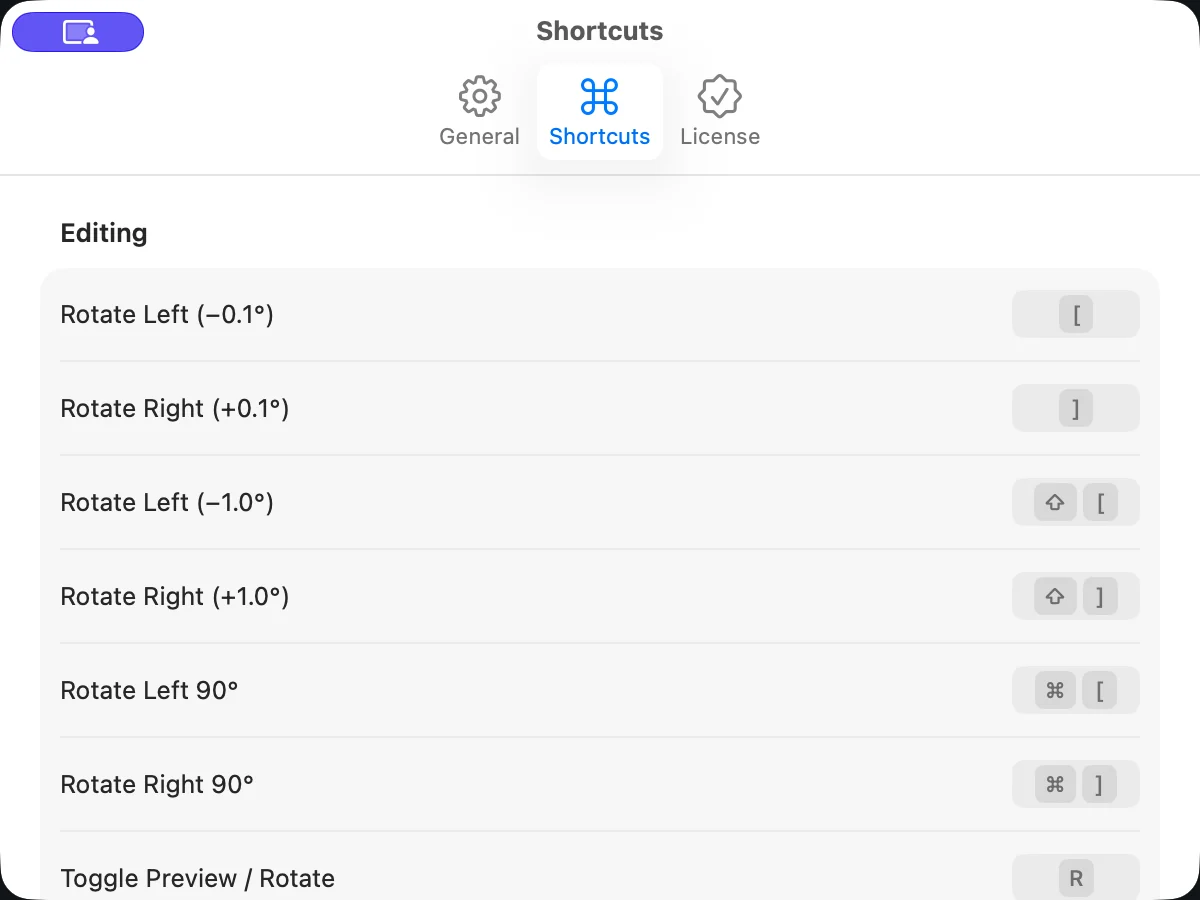
These are the default assignments. Change any of them under Shortcuts in Settings. Suihei warns you when two commands share the same keys, and Reset to Preset restores the original Lightroom-compatible preset.
Keys that macOS handles first, such as Spotlight or switching input sources, do nothing even if you assign them.
| Command | Default keys |
|---|---|
| Rotate Left 0.1° | [ |
| Rotate Right 0.1° | ] |
| Rotate Left 1.0° | ⇧[ |
| Rotate Right 1.0° | ⇧] |
| Rotate Left 90° | ⌘[ |
| Rotate Right 90° | ⌘] |
| Toggle Preview / Rotate | R |
| Apply Auto-Correction | ⇧W |
| Auto-Correct All | ⌥⇧W |
| Reset Correction | ⌘R |
| Leveling Tool (trace a line to level) | ⌘L |
| Confirm Suggestion | ⌃⇧W |
| Next Needing Review | N |
| Previous Needing Review | ⇧N |
| Command | Default keys |
|---|---|
| Move Crop Up | ⌥↑ |
| Move Crop Down | ⌥↓ |
| Move Crop Left | ⌥← |
| Move Crop Right | ⌥→ |
| Move Crop Up (Fast) | ⌥⇧↑ |
| Move Crop Down (Fast) | ⌥⇧↓ |
| Move Crop Left (Fast) | ⌥⇧← |
| Move Crop Right (Fast) | ⌥⇧→ |
| Enlarge Crop | ⌘↑ |
| Shrink Crop | ⌘↓ |
| Command | Default keys |
|---|---|
| Zoom In | ⌘= |
| Zoom Out | ⌘- |
| Fit to Window | ⌘0 |
| Previous Photo | ← |
| Next Photo | → |
| Extend Selection Backward | ⇧← |
| Extend Selection Forward | ⇧→ |
| Command | Default keys |
|---|---|
| Export Selection… | ⌘E |
| Export All… | ⇧⌘E |
| Add Photos… | ⌘O |
| Remove Selected from List | ⌫ |
Settings
Open Settings from the Suihei menu in the menu bar (⌘,).
- General: set the Method, Auto-Correction Strength, Auto-Correction Limit, Export quality, Confirmations (prompts before actions such as removing photos), Language, and Appearance.
- Shortcuts: change the keys for each command (see the table above).
- License: purchase “Unlock Export” or use Restore Purchases.
Prices and the free allowance are under Pricing, and other questions are answered in the FAQ.